
Do you may have crops in your yard that wish to climb? English cottage gardens sometimes do, and a picket yard obelisk (or tuteur) is a building that gives them room to roam.
You can purchase these constructions, nevertheless the related payment is prohibitive. $70 is probably the most price efficient one which I’ve seen they often can run to many an entire lot of {{dollars}}.
Do you may have a day to spare? It is time for a DIY yard decorations endeavor!
Proper now, I’ll be displaying you the best way to assemble a tuteur for about $50 – even a lot much less, for many who use reclaimed picket. Higher of all, you can too make the obelisk the color and dimension you need to suit your yard space.

What’s an obelisk?
The phrases obelisk and tuteur are typically used interchangeably, nevertheless there are some variations between them.
A tuteur is a four-sided pyramid type with a tapering excessive. It comes from French phrase for an obelisk shaped building that is used to teach climbing vines.

An obelisk is a tall stone type with a pyramid excessive. Obelisks are typically erected to commemorate an event, explicit individual or to honor diverse gods, akin to Cupid and Apollo. It is meant to resemble the ray of the photo voltaic. The shadow it casts follows the seasons spherical your yard.
The Washington Monument is a widely known occasion of an obelisk.
Every have a giant safe base and comparable tapering type. Tuteurs and obelisks sometimes act as yard art work elements throughout the yard. Even a yard teepee is a kind of an obelisk, although it is additional helpful than decorative.
The phrase obelisk is additional sometimes used than yard tuteur or yard teepee, when describing this yard building, nevertheless the endeavor we will be tackling proper now could be most exactly known as a tuteur.
Nonetheless you choose to name it, this climbing building offers a visual accent to any flower or herb yard.
To supply your crops one factor to climb on, assemble a picket yard obelisk. It is easy and low-cost to do. My husband constructed ours in a day. Get the tutorial on The Gardening Prepare dinner dinner. Share on X
Yard obelisk plans
We will be making our distinctive yard decoration out of picket. Many yard obelisks or tuteurs in the marketplace are product of metallic. These can get highly regarded in full photo voltaic, and can scorch delicate crops. A picket building takes care of that downside!
The merchandise confirmed beneath are affiliate hyperlinks. I earn a small payment, at no extra worth to you for those who purchase by means of an affiliate hyperlink.
Present document for the yard tuteur
Everytime you take a look on the document of offers beneath, you may assume that it’s a refined endeavor. Nonetheless, although it has a great number of objects, it’s actually comparatively easy to assemble.
Bear in mind: Vitality devices, electrical power, and completely different devices used for this endeavor is perhaps dangerous till used accurately and with enough precautions, along with safety security. Please use extreme warning when using power devices and electrical power. On a regular basis placed on defending instruments, and be taught to utilize your devices sooner than you start any endeavor.
You’ll need to gather these widespread offers to assemble your endeavor:
You presumably can print out the supply document throughout the endeavor card on the bottom of the put up.
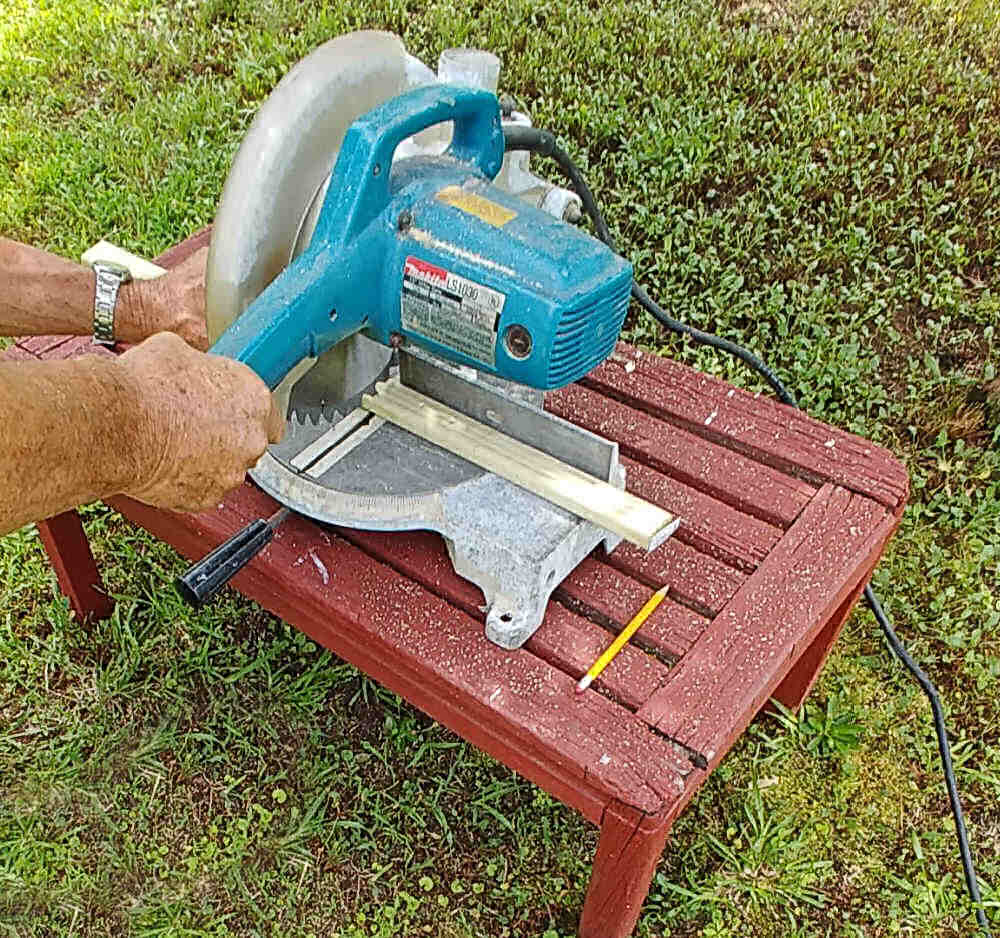
- Spherical observed or chop observed (use safety precautions)
- Hammer and subject of hails (1 1/2″ accomplished galvanized nails)
- Paint and paint brushes (sturdy color waterproofing stain)
- Pencil
- Tape measure
- Hand observed
- Screwdriver and 4 galvanized screws
 Wood needed for the ladder sides and obelisk excessive: (pressure dealt with is most interesting)
- 4 two-by-two objects of lumber, each 6 ft 9 inches prolonged
- Piece of picket roughly 10 inches sq. for the best
We used picket that was 1 1/2 inches broad and three/4 inch thick for the rungs and side helps. This offers somewhat little bit of overlap on the ladder rungs along with the side objects that be a part of the two ladders.
NOTE: This overlap was 1/2 inch in our endeavor and in our photographs. If you would like additional overlap, to make it easier to observed off, you could improve the dimensions of these objects to go effectively with.
- 2 x 9 1/2 inches – (1 1/2 x 3/4 inches timber)
- 2 x 13 inches – (1 1/2 x 3/4 inches timber)
- 2 x 17 inches – (1 1/2 x 3/4 inches timber)
- 2 x 20 1/2 inches – (1 1/2 x 3/4 inches timber)
- 2 x 24 inches – (1 1/2 x 3/4 inches timber)

Wood for the turning into a member of things These are longer to cowl the realm of the two by two on the edges.
(see discover above about these lengths)
- 2 x 10 inches – (1 1/2 x 3/4 inches timber)
- 2 x 14 inches – (1 1/2 x 3/4 inches timber)
- 2 x 18 inches – (1 1/2 x 3/4 inches timber)
- 2 x 22 inches – (1 1/2 x 3/4 inches timber)
- 2 x 26 inches – (1 1/2 x 3/4 inches timber)
Setting up the yard tuteur
Principally, you full ladder shapes after which combine them into one building. The toughest half is getting the joins on the edges to line up successfully when you join the two ladders to at least one one other.
The tuteur comes collectively shortly. Assembling it took about 2-3 hours. The rest of the time was in painting and letting the coats dry.
Setting up the two ladders
Measure and reduce your picket with a spherical observed or chop observed.
To assemble the first ladder, lay two of the two by two objects on a flat ground. Measure and mark up 11 inches from the underside for the underside 24 inch rung.
In case you might have clamps, the can keep the picket in place, nevertheless we constructed the obelisk with out them.
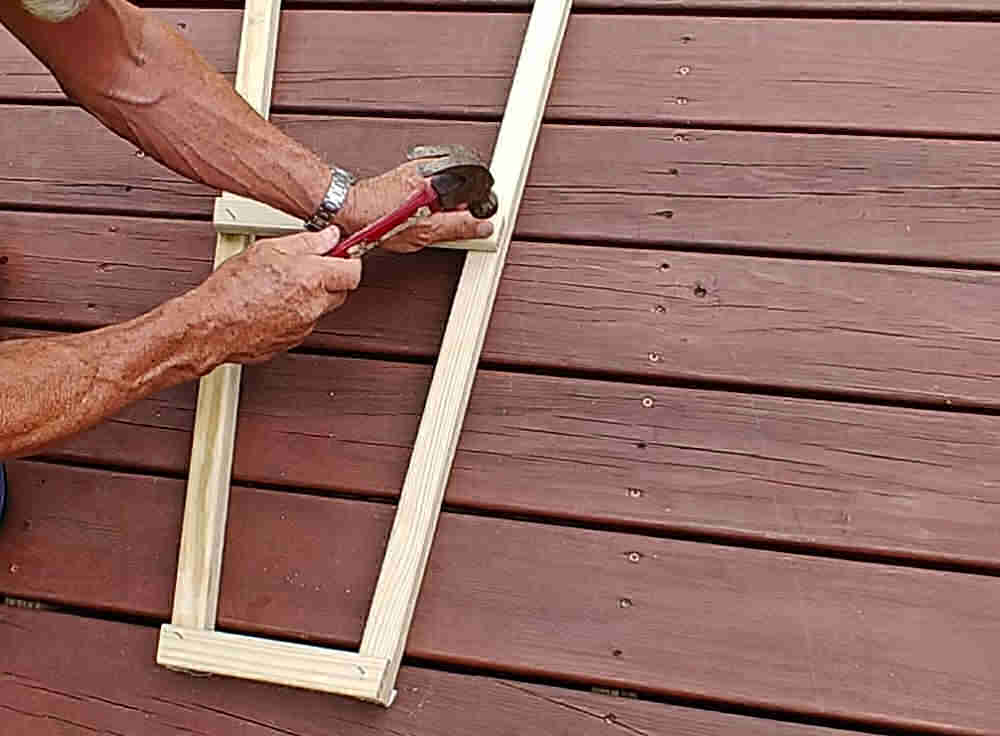
Place the reduce piece of 24 inch prolonged timber and nail it in place with the galvanized nails.
Angle the legs of the timber within the path of each other.
Place the 9 inch piece of picket all through the best house of the ladder legs. Nail it in place.
Measure and mark with a dot the place each of the inside rungs will sit. The spacing between the rungs of our ladder legs was 17 inches.
Place the alternative objects of picket on the edges and hammer them in place. You now have one ladder executed.
Repeat the steps for the alternative ladder.

Mark the overlap with a pencil and trim the ends in order that they line up with the uprights.
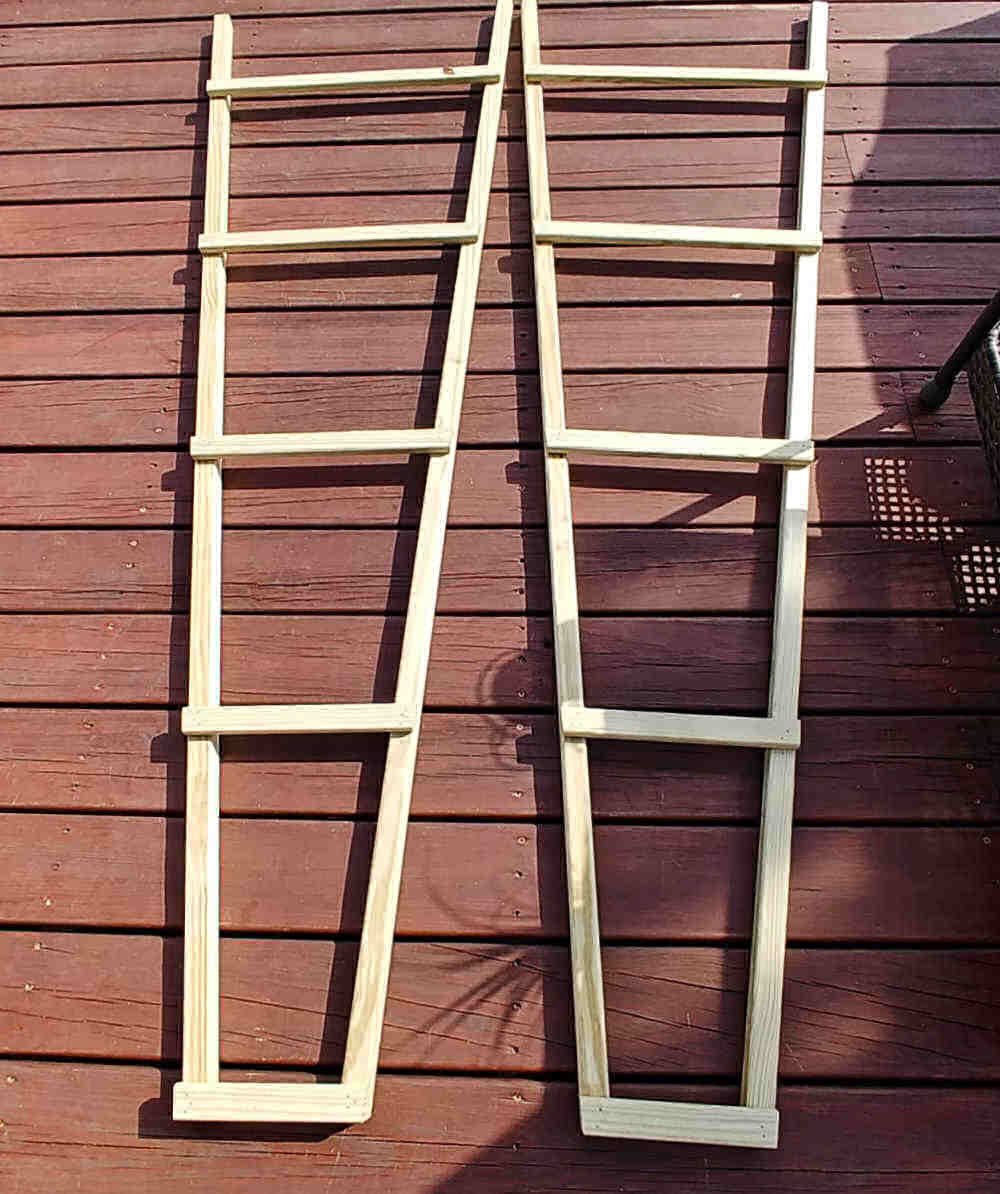
Constructing Tip: Within the occasion you lay the objects for the second ladder on excessive of the first ladder it’s potential so that you can to fully match the angles of the legs and the spacing of the rungs.
Changing into a member of the two ladders collectively
It’s time to assemble the obelisk! Place the two ladders in order that they’re on their sides.
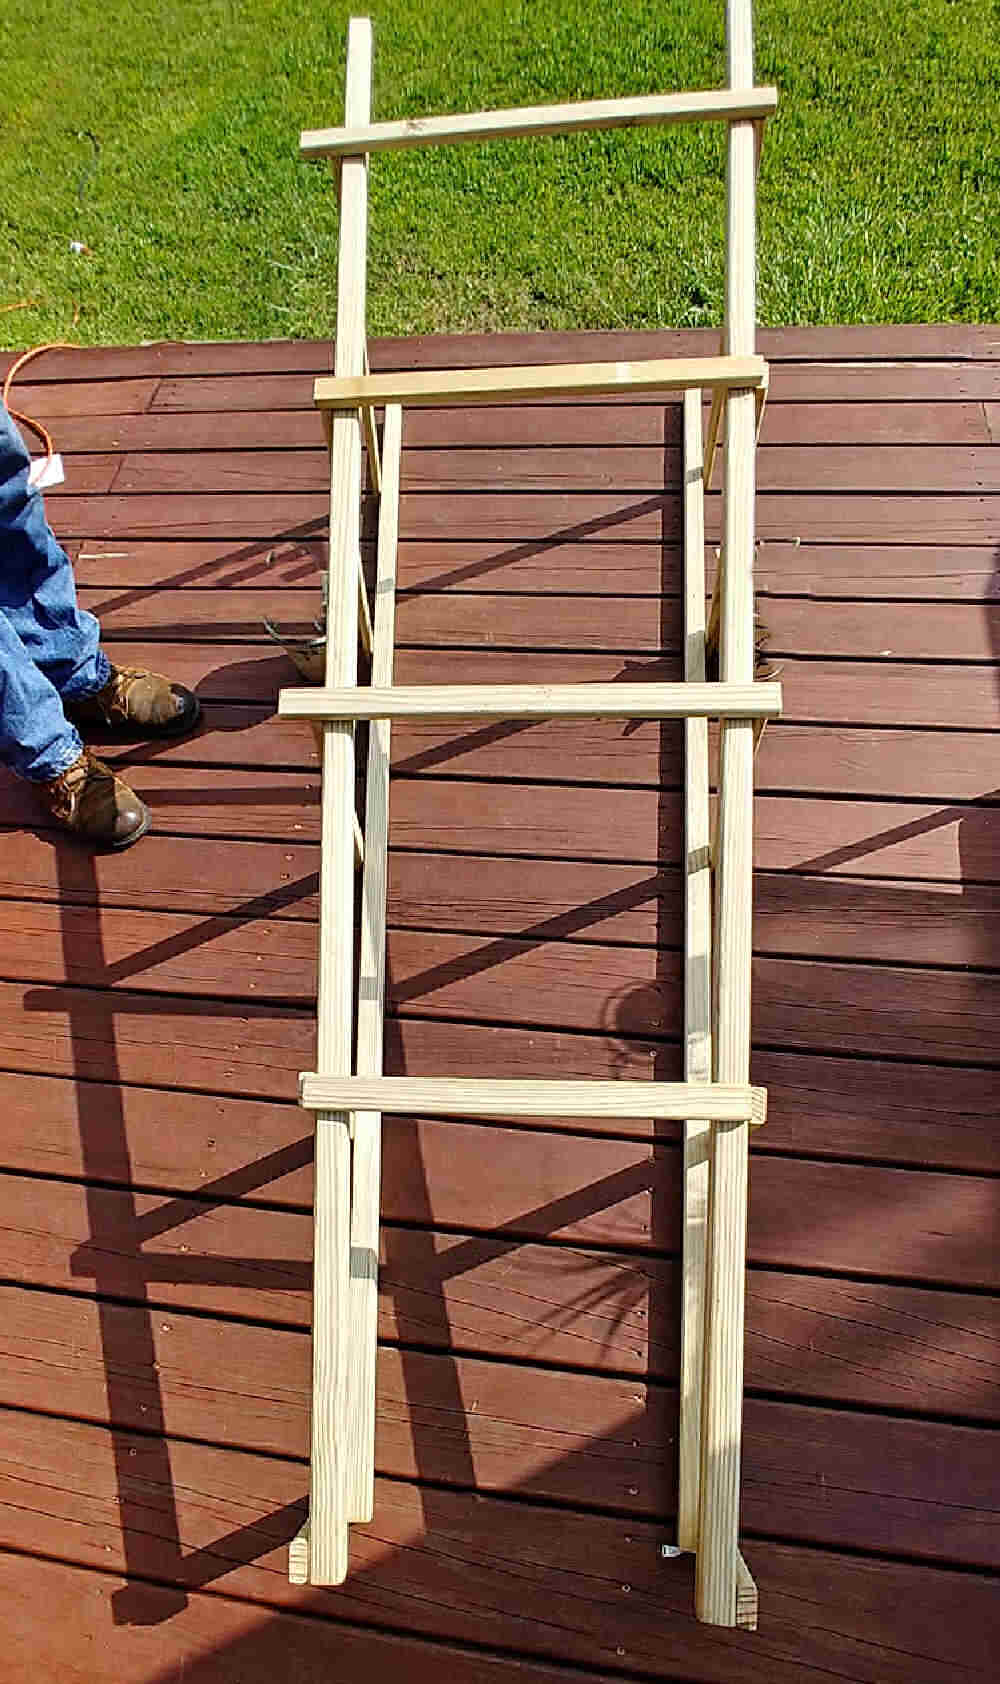
Lay the side rung objects on the ladder helps so that they overlap the edges. (You may trim these later.)
Nail the remaining rungs in place so that they be part of the two ladders and overlap the ends of the ladder rungs.
Start from the best and work down with the side objects. The shortest objects are related first, all the best way all the way down to the longest objects.
Flip the trellis over and join the picket objects to the ultimate open side, as soon as extra working from excessive to the underside with the remaining objects.
We tacked the objects in place first after which used three galvanized nails to secure each be a part of.
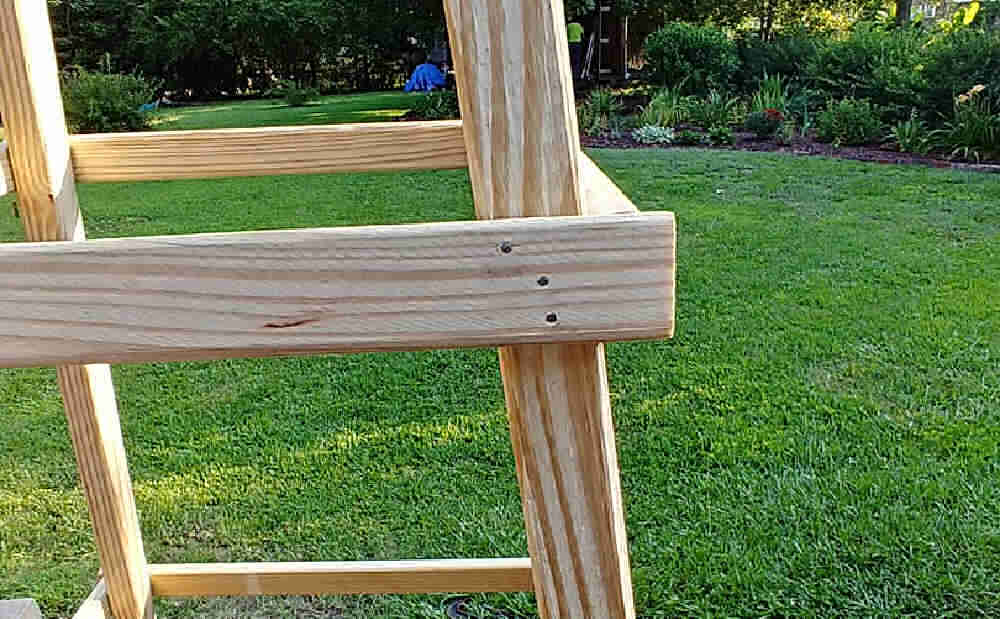
Trimming the side edges of the picket yard obelisk
You now have the important obelisk constructed, nevertheless the side edges often will not be accomplished. There could also be nonetheless overlapping picket that detracts from the look.

As a result of the picket objects are sq. nevertheless the edges of the obelisk are angled, you will must make some angled cuts to make the edges tidy.
Use the pencil to draw a line on the overlap of the picket on the edges after which use a hand observed to trim the excess. I’ve seen many picket obelisk plans that don’t ask for angled cuts, nevertheless you may very well see the excellence throughout the accomplished building for many who take the time to make them.
 Use a hand observed to trim off the excess picket.

Tada! Correctly accomplished edges!

Ending the picket yard obelisk
Now that the picket rungs on the edges are trimmed, stain or paint the obelisk as desired in your color choice. Use two or three coats for most interesting local weather security.

Within the occasion you want a rustic look, you could let the development local weather by itself. Cedar is an efficient choice for this type of building.
We used a Behr sturdy color waterproofing stain in a rust crimson color for our DIY yard obelisk.
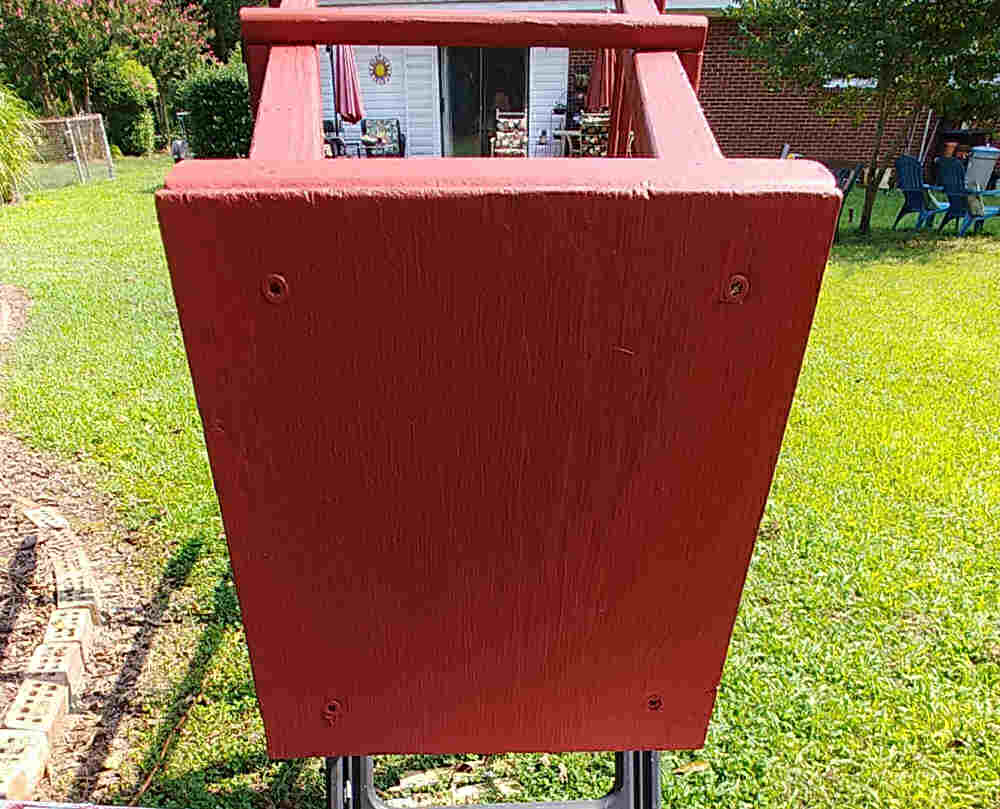
To finish off the best of the obelisk
The picket yard obelisk has a flat excessive which is solely related to the opening on the excessive with screws.
A yard tuteur is a useful trellis, nevertheless it may be used as a bit of DIY yard art work. There are lots of strategies which you may finish off the best of the obelisk to make it additional decorative. Ideas that bought right here to ideas had been:
- Depart the best opening flat because it’s big enough for a dangling basket to sit down down on. Take into consideration having your crop of strawberries trailing down over this building?
- Add a bit of picket extreme opening and join a painted picket finial.
- Use a solar-powered put up cap light so that the obelisk shall be illuminated at evening time. You can also use photograph voltaic lights on the uprights for additional decor.
- Join a brightly colored gazing ball to the best.
- Finish off the obelisk with a fowl house related to the best.
What crops develop on a yard obelisk?
Any climbing plant that has vines or tendrils is the best choice, since they might climb up the yard obelisk trellis. Climbing crops come is all sizes and types, from perennials, to annuals and even greens akin to pole beans.

Greens akin to runner beans, yard peas, and cucumbers all wish to climb up the development. You presumably may even use it as a tomato cage for retaining your tomatoes from falling over.
Flowering crops look incredible with their vines rising up a tuteur. Annual flowering vines work successfully as a result of the tuteur must be able to accommodate their weight. Some to consider are:
- Gloriosa Lily – this climbing lily has tendril-like suggestions concerning the ends of its leaves which is perhaps wonderful for climbing.
- Firecracker Vine – The crimson and yellow tubular flowers shall be good at attracting hummingbirds.
- Clematis – everyone knows how this plant likes to climb up a mailbox put up. Give it one different job climbing a tuteur.
- Mandevilla vine – this annual is a prolific flower producer all summer season season prolonged. This yr, it had a giant trellis behind it on our deck, nevertheless now it might develop up my new obelisk.
- Nasturtiums – this companion plant can entice useful bugs to your yard.
- Morning Glory – the blue trumpet-shape flowers look incredible on a light-weight blue obelisk.
- Sweet Peas – the flowering mannequin of the yard favorite likes to climb a tuteur.
Be careful when choosing crops akin to wisteria or big climbing roses. The burden of these crops may require your obelisk to be securely anchored throughout the ground.
Concepts for stabilizing a picket obelisk or yard tuteur
By design, a picket yard obelisk is tall and lightweight. This might indicate that it would topple over in extreme winds.
We stabilized our obelisk by attaching 4 objects of pressure dealt with two by two timber reduce on an angle so the legs had been lengthened and pointed. This allowed us to push the legs down into the earth for help.

There are a variety of strategy completely different strategies to stabilize a tuteur.
- Bury the underside legs of the obelisk throughout the ground, as a lot because the underside rung. (works most interesting with pressure dealt with picket.)
- Use a giant piece of slate beneath the tuteur to make it some stability and join ft for the slender legs to sit down down on.
- Cement the development in place.
- Tie the tuteur down with some rope and yard stakes.
The constructions might be utilized on exhausting surfaces or as a trellis in a giant container or raised yard mattress.
Whether or not or not you place your tuteur lined with climbing, flowering crops, or standing alone as a yard decoration, a tuteur shall be a strong focal point in your yard.
Use two of them on the doorway to your yard in a correct yard, or place one as a focus alongside a yard path. The makes use of are limitless!
One issue to remember is that widespread pruning and deadheading shall be two summer season season duties in your document of chores in case you might have an obelisk or tuteur.
Pin these picket yard obelisk plans
Would you desire a reminder of this put up for establishing a DIY yard obelisk? Merely pin this image to thought-about one in every of your gardening boards on Pinterest in order to easily uncover it later.

Admin discover: this put up for making a yard obelisk first appeared on the weblog in April of 2013. I’ve updated the put up in order so as to add all new pictures, a yard obelisk and a video so as to have the benefit of.
Prep Time
1 hour
Energetic Time
2 minutes
Additional Time
2 hours
Full Time
3 hours 2 minutes
Estimated Worth
$50
Provides
Ladder objects of picket ( 1 1/2 x 3/4″ timber)
- 2 objects 9 1/2 inches prolonged
- 2 objects 13 inches prolonged
- 2 objects 17 inches prolonged
- 2 objects 20 1/2 inches prolonged
- 2 objects 24 inches prolonged
Changing into a member of side objects of picket (1 1/2 x 3/4″ timber)
- 2 objects 10 inches prolonged
- 2 objects 14 inches prolonged
- 2 objects 18 inches prolonged
- 2 objects 22 inches prolonged
- 2 objects 26 inches prolonged
Ladder helps and obelisk excessive
- Piece of picket 10 inches sq.
- 4 – two-by-two inch objects of lumber, each 6 ft 9 inches prolonged
- 4 objects of two by two inch timber for ft help, each 10 inches prolonged
Devices
- Spherical observed or chop observed
- Pencil
- Tape Measure
- Hand Seen
- Screwdriver and hammer
- Subject of galvanized nails
- 4 galvanized screws
- Paint and Paint brush
Instructions
- Measure and reduce picket to the lengths confirmed above.
- Lay two of the two by two objects on a flat ground.
- Measure and mark up 11 inches from the underside for the underside 24 inch rung.
- Place the reduce piece of 24 inch prolonged timber and nail it in place with the galvanized nails.
- Angle the legs of the timber within the path of each other.
- Place the 9 1/2 inch piece of picket all through the best house of the ladder legs. Nail it in place.
- Measure and mark with a pencil the place each of the inside rungs will sit. The spacing between the rungs of our ladder legs was 17 inches.
- Join the inside rungs to the leg helps on the areas marked with pencil.
- Repeat these steps for the alternative ladder half.
- Mark the overlap of the picket with a pencil and trim it flush with the angle of the edges.
- Place the two ladders in order that they’re on their sides.
- Place the side help objects on the same placement as a result of the ladder rungs and nail them in place. They’re going to overlap the edges.
- Use a pencil to mark the overlap, then use the hand observed to make cuts alongside the pencil traces.
- Return and reinforce each be a part of so that you’ve got three galvanized nails in each be a part of.
- Decrease a bit of picket the scale of the best opening and join in place with the 4 screws.
- Use the chop observed to cut the 4 ends of the ladder leg help on angle in order that they’re pointed, and nail them to the obelisk legs. It’s going to help to help the obelisk.
- Paint or stain your obelisk with three coats of waterproof sealer.
- Push the pointed helps into the underside.
- Add crops or greens on the bottom and watch them cowl the obelisk in a short time!
Notes
Situations for the endeavor are for two coats of paint. Within the occasion you do three coats, it might take longer for the painting time.
Advisable Merchandise
As an Amazon Affiliate and member of various affiliate functions, I earn from qualifying purchases.